Showing posts with label Tutorial. Show all posts

Sunday, December 4, 2011

Natural School or Work Look!

It will be no surprise to you all that I enjoy a dramatic eye. So I decided to switch it up and show you guys a soft work inspired look using Coastal Scents Go Palette in Beijing. 


It's always great to have  few softer looks in your pocket for when you need to tone it down a bit and look effortless. In this look I will use rather inexpensive products that you can get at any Drugstore or on CoastalScents.com 

The Go Palette is available on CoastalScents.com for $8.95 and if definitely worth the bucks. You get 12 very pigmented shade in an easily carried palette. All the shade work great together and there are a lot of choices o pick from. I have the Beijing and Moscow. In this i'm using Beijing which is earthy browns and pinks. I adore the combination of pink and brown together! 


As you can see the look is very minimal and natural. I like this look because its simple and quick but polished as well. You could easily do this with a variation of many products that you already have.

I always start my makeup by moisturizing and applying a primer. The primer of the day is Rimmel Fix and Perfect Pro in 002
  • First i applied my foundation all over my face. I used Revlon Colorstay in 150 Buff. This is a great base for the concealer and bronzer which I applied next. I like to dab my foundation on my chin cheeks and forehead and them blend outward with a damp sponge. I like using a sponge better than a brush because i get better control than if i use a brush. Maybe i just haven't found a brush that i love yet. 
  • Once my foundation is applied i used Hard Candy Glamoflauge in Light around my eyes and my nose.  I also have whats seems to be a chicken pock mark under my left eye so i cover that as well. I love Glamoflauge! I`ve said it a million times! 
  • After my Concealer a top with a light dusting of powder to set y foundation. I used Revlon ColorStay pressed powder in light. Than i applied a light dusting of NYC Smooth Skin Bronzer in Summer to add a bit of color.  I just left both out of the picture below by accident. 
  • When doing my eyes i applied a small dab of NYX HD eyelid Primer to my lids to create a great base. This is probably my favorite primer for my lids. You get lots of product and lots of staying power for just 7 bucks! GREAT DEAL!
  • I started my eye look by applying the light pink shade shown in the top row of the palette. This is the third from the left. I wish the palette had color names on them but they don't.  But the color is Called Pink Salmon. I put this all over my lid with a flat shadow brush and blend a little into the crease. 
  • I than use the medium brown show in the bottom third from the left in my Crease. This shade is called Antique Chocolate Burgundy. I apply this in a back and forth motion with a small crease brush. I used my 1.00 ELF Pro crease brush. 
  • Using a fluffy bare crease brush I blended out the rough edge to make it blend all the way to my brow. 
  • Now it`s time for liner! I used my Maybelline Master Drama in Midnight Master which is basically black. I always sharpen this automatic liner because I wanted a fine line. I started right at the inside tear duct and worked out applying the liner as close to the lashes as I can. I also winged it out slightly.
  • I applied two coats of  Revlon Grow Luscious Mascara in Black to my lashes and my eyes are done.
  • Once my eyes are done i go in with two dots of Coastal Scents Bright Eyes to brighten my under eyes. It has a great pink salmon tone that just brightens up the eyes.  
  • As for lips I lined and filled in the sides of my lips with Wet N Wild Burgundy Wine. I leave a small opening in the middle of my lips to give them some dimension. Than topped with Rimmel Stay Glossy in NON Stop Glamour. 

PHEWF! That took forever to write out! I think I may go into detail to much!! :)

I really like the look. It looks easy, Soft and Feminine. 

Here are some closer looks!


(Excuse my brows! Im growing them out for the winter to get them shaped again! )

Thanks for tuning in and I hope you like this look and try it out!


Monday, November 14, 2011

Quo On the Go Palette Tutorial (All Drugstore)

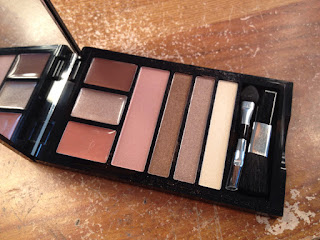
At Shoppers Drug Mar the carry a brand called Quo. Right now they have the cutest make u kits and Palettes out for the holidays I picked to the On The Go Palette and decided to do an All Drugstore Makeup look with it. The Palette is quite pretty. Its a little shimmery but it has a few very nice browns in it. This palette has three eye shadows, 1 blush,and 3 lipsticks. It also come with a mirror and two little brushes to apply it all. 

This palette cost me 15.00 at shoppers and i think its worth it. 


In this look I used all drugstore products. At the end of this post there will be a list of everything I used. The only thing I used that wasn't drugstore was the brushes which I bought from ELF at eyeslipsface.com 

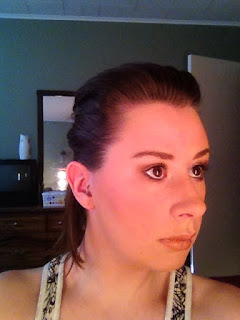
Here is my Base Face in which I already applied my Foundation, Concealer, Powder and Bronzer. You can see that I Conoured my cheeks a little with the NYC Sunny Bronzer. I don't have the most prominent Cheek bones so i find doing this brings them out a little. Not the most attractive picture :)  but you get the point! Keep checking back for a  post on how to contour your face!


The three eye shadows are a shimmery off white color that is great for a highlight and a base shade. The middle shade is a medium shimmery brown that is very warm. The third is a darker brown that is also shimmery. I used the light as a base, the medium o the middle and outer of my lid and the darker in my crease and as an outer V. 

I lined my upper lid with a brown liner in a very thin line. I also think you could wing the liner out and it would look really nice. I didn't do this. I lined the outer side of my bottom lashes and smudged it with my finger. I topped it with two coats of mascara and i was done with the eyes. 

I applied the blush on the apple of my cheeks and worked towards my temples. I like this blush. Its very soft and complementary for my pale skin.

The lipsticks are just OK to me. There is a light peachy nude color that I used in this look over the nude lip pencil. The middle color is very metallic and I cant find a reason why I would wear it on its own. I may use it under a lip gloss to counter act the shininess. The darker color is quite nice and i can myself using it with a very simple eye. I don't normally wear dark browns but i'm trying to try new looks. 


 I like this look. Its warm and appealing and i think it make my brown eyes pop. 


 I also tried the look with my hair down and a little wavy and my bangs pinned back. I think both looks are nice but i think i like it up better. 


I took a few pics up close so you could see the eyes better.


I look like i have a giant nose in this hahahaha
As you can see these colors blend really well. And the colors are really nice. The only down fall i think is the metallic lipstick in the top middle. I personally wont use it. It's too bold for me. 15.00 bucks for this palette in a good deal. The quality is quite nice and ive been wearing it for 6 1/2 hours and its still going strong. So longevity is good also. I think ill use this palette enough to warrant the 15.00 price. I's a great alternative to higher end palettes. 

Let me know what you think of this look and if you've tried this Palette.  


What i used in this look:
Rimmel Fix & Perfect Pro Primer in 002
Revlon Colorstay in Buff
Hard Candy Glamoflauge
Milani Multitasker Powder in Light
Milani Brown fix
NYC Smooth Face Bronzer in Sunny
NYX HD Eye lid primer
LAncome Hypnose in Black
Quo On The Go Palette

Sunday, November 13, 2011

Do It yourself Vanity Mirror! & Link Love!

I`ve decided to dedicate every Sunday to Links that I Love! I`m always trying to find new blogs to read or things to play with. In this entry you get some great blogs and a link to a Do It Yourself Vanity Mirror that i made and it`s awesome. 
  • Beauty Broadcast - I have to say that I am a religious reader of Beauty Broadcast. Written by Emilynoel83 who has a background in journalism and a severe love of all things beauty. She makes you feel warm like your reading something a friend has written. Emily also has a YouTube Channel HERE where you can find some great tutorials and product reviews. She is amazing and I have to say that she`s inspired me to start this blog. 
  • MakeupandBeautyblog.com - This is a new blog that I found a day or two ago. Its run by a woman named Karen who is awesome! Her blog is very informative and I love how organized she is. If you look on the right had side in the middle of the page she has 4 Tabs Popular, Bargain, How to and Link Love (this seems to be the universal term we all use for links that we love, haha). These tabs make it really easy to look for something that you need. If Ì`m in the mood for a How To I can do that. If I want to know whats popular I can do that. I also love how none of her blog post titles are short and sweet like the rest of us. They're all long and for some reason I find that really funny and sweet. 
  • Jroseonline - This isn't a blog that i read a lot. But I did find the best thing on this blog.  I have always wanted one of those Beautiful Vanity Mirrors that you often see in Professional makeup artists videos and blog posts. (Emilynoel83 has one and im totally jealous!) Well, They can be quite exspensive, and as a mom i don`t have 300 bucks plus shipping to buy myself one and have it shipped to little Newfoundland Canada  So when I found this post by JRose I was ecstatic. Here is the address to her blog post about making your own Vanity Mirror!  The process is every simple and you only need a few Things. Check it out! Ive posted the pics of my New Handmade Vanity Mirror!


This is the mirror from the right. I`ve attached it to my desk. If you notice,the light bar is a bit higher than my mirror, but you can get different sizes. If I had my time back I would have measured. You can actually attach this to the wall if you have a flat style desk. I didn`t because I`m renting.

You can notice that i have a bunch of space behind the mirror to hold things hat i don't want to see all the time. Sponges, tissues and such. it`s great storage for unused items that i may only need a few times a year. You can see this below. 


I love it. I`ve attached it to my desk in a way that I can remove it. We are planning on buying a house in the future so I wanted it to be able to come off the desk and be placed on the wall in the new place easily. 

I have to say that it turned out well. It cost me less than $100.00, where a bought one would have been at least $300.00. I`m very proud of my electrical skills. Thanks JROSE you Rock!

Check out the links, And show some love!


Friday, November 11, 2011

SallyGirl Baked Eyeshadow Minis

I am a recent member of the Sally beauty supply here in St John's NL. To be honest i didn't know we had one until i drove past it. I'm glad i did because i found a few really cool things there. Not only did i find Paladio Stuff that many of my guru loves have talked about it the past and i thought i couldn't get here.  I found a bunch of these little Sally girl Baked Eye Shadow mini's. Which i paid only $1.35 each for. (That's Canadian) But i bet they are much cheaper in the US. 

I have three of them so far but or that price ill probably pick up a few more to see what other shades look like. I have a Bright Purple, Bright Pink and a Bright teal/turquoise color. I swatched them on my hand and they tend to swatch better on my finger tip than when i wipe them on my hand. The good thing about these is that the are Baked so you can wear them wet, which is how i put them on my eyes. 


 I decided to do an eye look for you guys using the pink and the purple. Although i think the teal and purple would look just as cute.

I used: 
Rimmel Fix & Perfect Pro 002 Primer
Revlon Colorstay Buff
Hard Candy Glamoflauge in light 
Revlon Colorstay powder in Light
NYC Smooth bronzer in Sunny
 Milani Baked blush in Lumunoso
Milani Brow Fix to fill in my brows (They grow weird) 
NYX HD eyelid primer
Sally Girl Baked eyeshadows
Maybelline Master Drama liner in Black
Revlon Grow Luscious Mascara in Black


  • First i put my Primer, Foundation and Concealer on as usual. Concentrating on any trouble spots. And topped it off with my Colorstay powder. 
  • Than i used NYC Sunny to add a little color to my face because I'm rather pale. I also used Milani Baked blush in Lumunoso to pink up my cheeks. 
  • After filling in my brows with the Milani Brow Fix i put a little HD Primer to my lids and blended in with  my fingertips. 
  • I used the Pink SallyGirl shadow all over my lid. I applied this wet with a sponge applicator and a little water. I than applied the purple wet in my crease and blended outward. I used a blending brush to blend the edges to make it look more seamless. 
  • Using the Master Drama Eyeline lined my upper lid and winged out the ends sligtly. I than lined the outer edge of my lower lid and smudged it with a smudge brush. 
  • Top with a coat of the Grow luscious Maskara and your eye is done. 
  • I went with a really nude lip with this bold eye by using a ELF super glossy lip gloss. The color wasnt named on the package but i think its called Candlelight


I love how this look turned out. It makes my eyes look so bright. My Little one likes it too. 


Thanks for reading!


Little Tidbit's:
  1. I put Body Wash in my hair today and had to was my hair all over again. 
  2. I lounged all day with my hubby and Caelen and watched kids movies.
  3. I am starting to get obsessed with twitter. Its too fun!